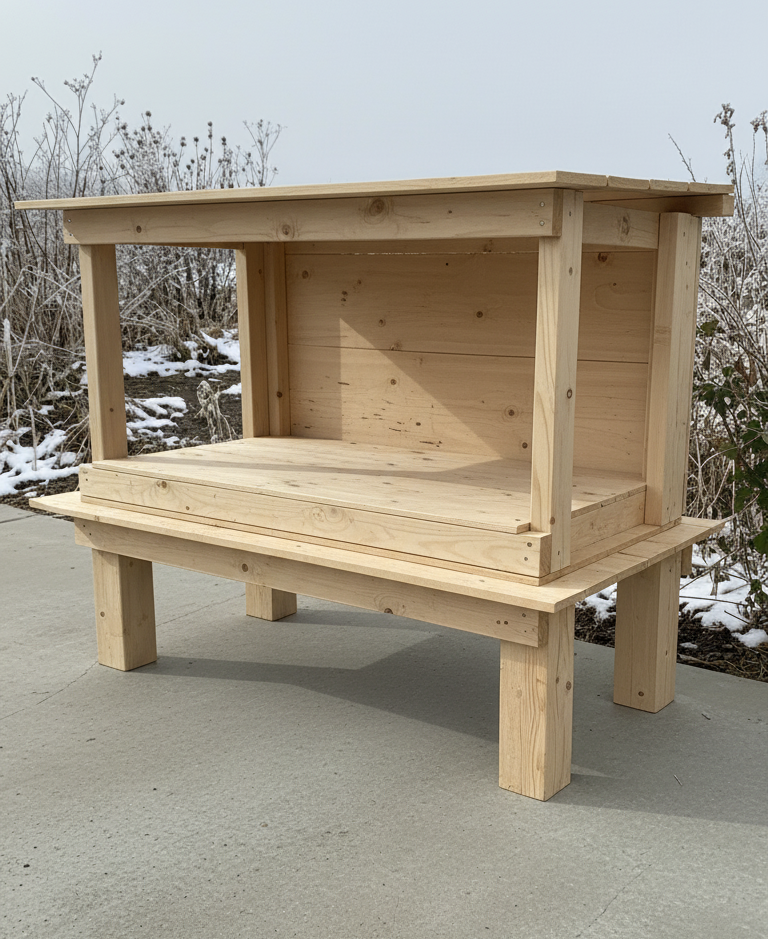
Open-Air Covered Feeding Station
This plan details the construction of your specialized, heavy-duty station: a sturdy Base Table with 4x4 legs and a detachable Pole Barn Shelter Top featuring an integrated framed floor kit for maximum strength and weather protection.
📐 Dimensions & Cuts List
- Final Dimensions: Approx. 24" Deep x 36" Wide x 18" High Shelter.
- Lumber: Use Pressure-Treated (PT) Lumber for all 4x4 and 2x4 framing. Use Exterior Grade Plywood for the floor and roof.
| Component | Material | Quantity | Dimensions (Cut) | Purpose |
|---|---|---|---|---|
| Legs | 4x4 PT | 4 | 24" | Table Base Support |
| Frame (Long) | 2x4 PT | 4 | 36" | Base Table Frame (2) & Pole Barn Framed Floor Kit (2) |
| Frame (Short) | 2x4 PT | 4 | 21" | Base Table Frame (2) & Pole Barn Framed Floor Kit (2) |
| Table Top Deck | Plywood (3/4") | 1 | 24" x 36" | Base Table Deck |
| Shelter Floor | Plywood (3/4") | 1 | 24" x 36" | Pole Barn Floor Kit Deck (Adds crucial weight/seal) |
| Back Wall | Plywood (1/2") | 1 | 36" x 18" | The single solid wall of the Pole Barn Shelter |
| Roof Supports | 2x4 PT | 2 | 18" | Front vertical supports for the roof (optional 2x2s can be used) |
| Roof | Plywood (1/2") | 1 | Approx. 28" x 40" | Needs overhang on three sides for rain protection |
🔨 Phase 1: The Base Table (Heavy Foundation)
This section creates the raised platform with 4x4 support.
- Assemble the Frame: Create a 24" x 36" rectangle using two 36" long 2x4s and two 21" short 2x4s. Screw the corners together using 3" deck screws.
- Attach the Legs: Secure the four 24" 4x4 PT Legs into the inside corners of the frame. Use at least 2-3 screws through the 2x4 frame into the 4x4 leg on each side of the corner.
- Install the Deck: Place the 24" x 36" Plywood Table Top Deck onto the top of the frame and secure it using 1 5/8" wood screws.
🏠 Phase 2: The Pole Barn Shelter Top (Framed Floor Kit)
This structure is a strong, weighted unit with an open front and sides, built around its own distinct floor kit.
- Build the Framed Floor Kit: Assemble the remaining two 36" long 2x4s and two 21" short 2x4s into a second 24" x 36" rectangular frame.
- Attach the Shelter Floor: Place the second 24" x 36" Plywood Shelter Floor on top of this frame and secure it with 1 5/8" screws. This forms the rigid floor kit base for the shelter walls.
- Install the Back Wall: Center the 36" x 18" Plywood Back Wall on the back edge of the framed floor kit. Screw it vertically into the back 36" 2x4 frame piece and down into the plywood.
- Install the Roof Supports (Poles): Secure the two 18" vertical supports (2x4 or 2x2) at the front corners of the framed floor kit. Screw them vertically through the floor and into the 2x4 frame below.
- Install the Roof: Cut the roof plywood piece (approx. 28" x 40") for overhang. Place it on the structure, resting on the 18" Back Wall and the two 18" Front Supports. This creates the essential forward slope for rain runoff. Secure the roof plywood to all contact points.
- Roofing & Sealing: Apply shingles or metal roofing. Crucially, seal all seams with exterior caulk before the next step.
🎨 Phase 3: Sealing and Final Field Assembly
Sealing (DO NOT SKIP)
Before transport, fully seal the wood using exterior primer and two coats of exterior paint, or a heavy-duty deck stain/sealer. Pay careful attention to all exposed plywood edges. Allow all products to fully cure before use.
Field Installation
- Lay Pavers: Place the four Concrete Pavers to serve as the stable foundation for the 4x4 legs. Level carefully.
- Set Base: Place the completed Base Table onto the pavers.
- Set Shelter Top: Lift the heavy Pole Barn Shelter Top and center it precisely onto the Base Table deck.
- Lock it Down: From inside the shelter, drive long 3" deck screws down through the Shelter Floor plywood and the 2x4 floor frame, penetrating deep into the Table Base deck. This secures the two pieces into a single, highly stable unit.
.jpg)