1. Design overview
Purpose: Weather-sheltered outdoor cat feeding station with clear sides, a pet door, and a hinged, latched roof for easy cleaning.
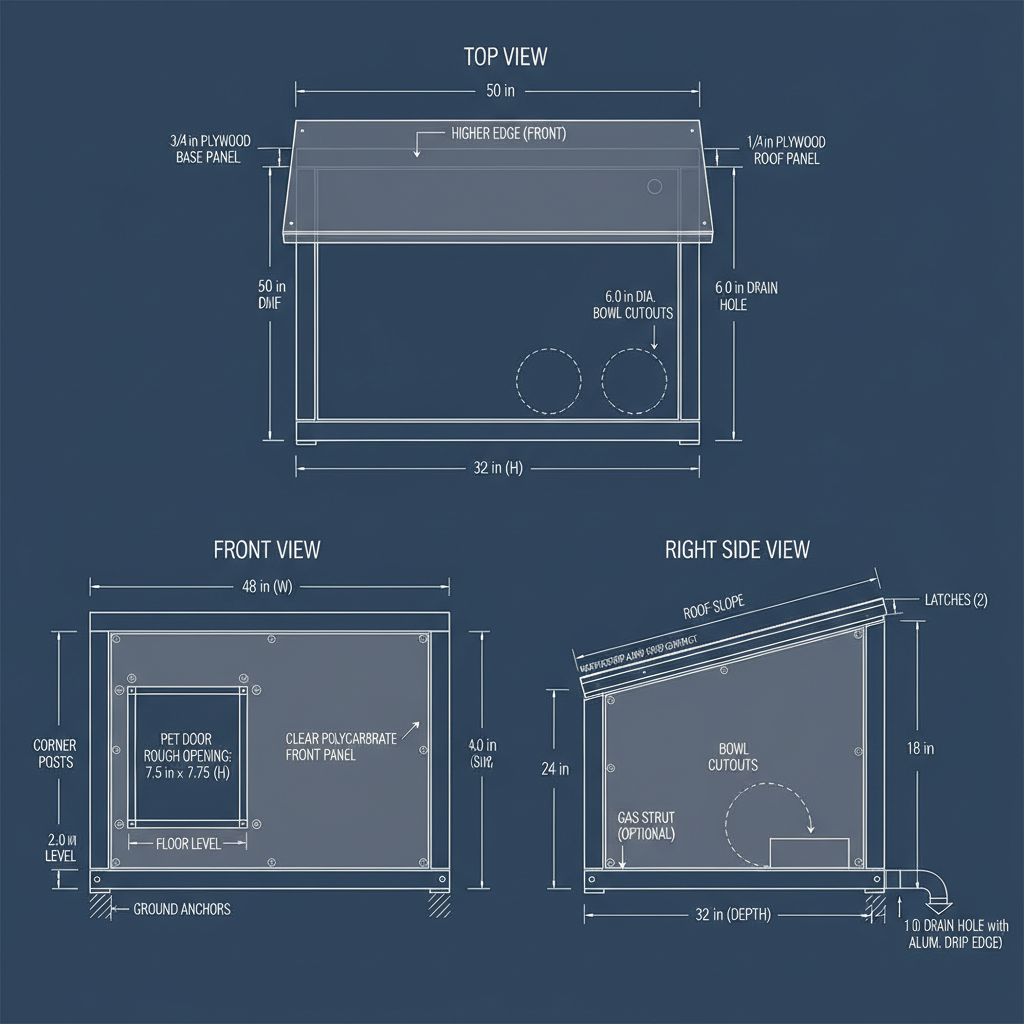 Recommended outside dimensions: width 48 in, depth 32 in, front height 24 in, rear height 18 in (roof slopes away from the building).
2. Materials
Recommended outside dimensions: width 48 in, depth 32 in, front height 24 in, rear height 18 in (roof slopes away from the building).
2. Materials
Framing: 2x2 cedar or PT pine, straight and dry.
Base and roof: 3/4 in exterior plywood (base) and 1/2 in exterior plywood (roof).
Clear panels: 0.118–0.236 in polycarbonate sheets (impact-resistant; better than acrylic).
Fasteners: exterior screws (#8 x 2 in for framing; #8 x 3/4 in for panels), washers, pocket-hole screws (optional).
Hardware: 30–48 in stainless piano hinge, two draw/latch hasps, two prop chains or one gas strut, magnetic catches (optional).
Seals: silicone sealant, EPDM foam weatherstrip (3/8 in), butyl tape for panels, neoprene washers.
Roofing: EPDM rubber membrane or asphalt shingles with roofing felt; aluminum drip edge.
Pet door: small cat door (e.g., PetSafe), rough opening about 7.5 in x 7.75 in; verify your model.
Bowls: two stainless bowls with rims sized to sit in 6.0 in cutouts.
Finishes: exterior paint or penetrating sealer for wood.
Basement: four 2x3 treated skids or pavers to elevate base 1.5–2.0 in off ground.
Anchors: masonry screws or ground stakes if needed.
- Cut list (for 48 in x 32 in footprint)
2x2 lumber
Bottom rails: 2 pcs at 48 in, 2 pcs at 32 in.
Top rails: 2 pcs at 48 in, 2 pcs at 32 in.
Corner posts: 2 pcs at 24 in (front), 2 pcs at 18 in (rear).
Front mid rails around pet door: 2 pcs at 14 in (vertical studs), 2 pcs at 12 in (horizontal door frame; adjust to your pet door).
Side mid rails (optional for panel support): 2 pcs at 24 in (front), 2 pcs at 18 in (rear).
Plywood
Base: 1 pc at 48 in x 32 in.
Roof: 1 pc at 50 in x 34 in (1 in overhang).
Polycarbonate panels
Front: 1 pc at 48 in x 24 in with cutout for the pet door (or use a separate wood insert panel for the door area).
Rear: 1 pc at 48 in x 18 in.
Sides: 2 pcs trapezoids, depth 32 in, heights 24 in (front) to 18 in (rear).
Roofing
EPDM sheet or shingles and felt to cover the 50 in x 34 in roof.
Drip edge for all four roof edges.
- Base and frame assembly
Prepare the base
Cut 3/4 in plywood to 48 in x 32 in; seal all edges with exterior paint or sealer.
Mount the base on four 2x3 treated skids (running the 32 in direction) to elevate it 1.5–2.0 in above ground.
Mark and cut two 6.0 in diameter bowl cutouts near the side and rear corners; add a 1.0 in drain hole at the rear-most low corner. Sand all cut edges.
Build the bottom rectangle
Screw the 48 in and 32 in 2x2 rails together (butt joints) as a 48 in x 32 in frame. Square and pre-drill.
Attach base to bottom frame
Center the plywood on the frame; screw down every 8–10 in around the perimeter.
Install vertical posts
Front corner posts: 24 in. Rear corner posts: 18 in. Screw through bottom rails into posts; verify plumb.
Install the top rectangle
Attach the 48 in and 32 in top rails to form the upper frame. Confirm the front height (24 in) and rear height (18 in) to set the roof slope.
Frame the pet door opening
On the front face, add two vertical 2x2 studs spaced to fit your pet door’s outer trim. Add top and bottom 2x2 rails to create a rigid wood opening. Keep the bottom of the opening 2.0 in above the floor to minimize snow intrusion.
Dry-fit the pet door; mark and pre-drill.
- Clear panel installation
Front panel
Option A (cut-out): Cut the pet-door hole in the polycarbonate using a fine-tooth blade; edges taped. Option B (recommended): Use a smaller wood insert panel around the pet door and mount polycarbonate around it (no large cut in plastic).
Apply butyl tape to the frame contact surfaces. Pre-drill panel holes 3/16 in and use #8 screws with neoprene washers every 8 in; do not overtighten.
Rear and side panels
Fit trapezoid side panels; maintain 1/16–1/8 in gap for thermal expansion. Seal with silicone after fastening.
- Roof, hinge, and latches
Roof panel and membrane
Cut 1/2 in plywood to 50 in x 34 in for 1 in overhang. Seal edges. Install aluminum drip edge around all sides.
Apply EPDM membrane or felt plus shingles. Ensure water sheds toward the lower rear edge.
Hinge installation
Mount a 30–48 in stainless piano hinge along the higher front edge, attaching the hinge to the roof panel and the top front rail. Use exterior screws and a continuous bead of sealant under the hinge leaf attached to the frame.
Support and latching
Install two draw/latch hasps on the lower rear edge aligned to rear top rail. Add a keyed hasp if raccoons are common.
Add a gas strut on one side (rated for 10–20 lbf) or two short chains to hold the roof open during maintenance.
Apply EPDM foam weatherstrip on the top rails where the roof touches; compress sufficiently when latched.
- Pet door mounting
Follow the manufacturer’s rough opening; typical small cat door is about 7.5 in x 7.75 in.
Mount the door into the framed wood opening with screws; caulk the perimeter. Place the lower flap edge at least 2.0 in above the floor.
- Interior details
Fit the two stainless bowls into the 6.0 in cutouts; add short setscrews from below or a thin lip to keep bowls from rattling.
Optionally install a small thermostatically controlled heating mat under one bowl to prevent freezing; route cable through a grommeted hole with a drip loop and seal around the penetration.
- Weatherproofing and anchoring
Seal all panel seams with a small exterior silicone bead.
Add a 1.5 in roof overhang to the rear if splashback is an issue; keep drip edge continuous.
Anchor the frame to the building with two L-brackets on the front-side rails or stake the front corners to the ground to prevent shifting.
- Ventilation and condensation control
Drill two 1.0 in screened vents high on the side panels (front side) to reduce condensation while maintaining warmth.
Keep the drain hole clear; add pea gravel under the rear overhang for runoff.
- Finishing and maintenance
Sand exposed wood and apply exterior sealer/paint. Re-coat annually.
To clean: unlatch rear hasps, raise roof using the gas strut or chains, lift out bowls, wipe floor, and rinse toward the rear drain hole.
Inspect weatherstrip, hinge screws, and panel fasteners seasonally; tighten as needed.
- Adjustments for heavy snow or large cats
If snow load is high, switch framing to 2x3 lumber and add one 2x2 roof cross-tie. Increase hinge and latch sizes accordingly.
For larger cats, raise the front height to 26 in and widen the pet door opening per manufacturer’s large size.
All dimensions can be scaled; maintain at least a 6 in roof drop over 32 in depth for reliable shedding.

.jpg)